|
Pedestal Grinder Procedures
|
| Grinding
Wheels
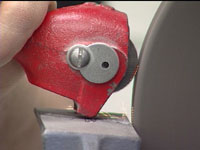
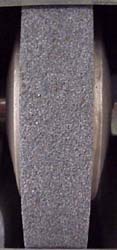
Grinding wheels are made up of abrasive particles that are held
together by a glue-like material called the bond (Figure 1).
Almost all grinding wheels made for pedestal grinders are made
with artificial abrasives, namely silicon carbide and aluminum
oxide. Artificial abrasives have replaced natural materials, such as
emery and corundum, because of their superior hardness and
durability. |
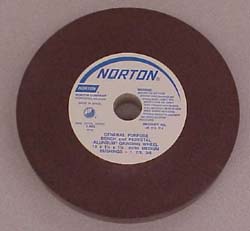
Figure 1 Pedestal grinding
wheel
|
Grain Size
Prior to molding into wheels, the abrasive particles are graded for
size by passing over a series of vibrating screens. The grain size is
determined by the mesh of the smallest screen through which the grains
will pass. For example, if the mesh has 100 openings per
lineal
inch, the grit number will be 100.
| The grain size determines the
coarseness or fineness of the grinding wheel. The grain sizes of
abrasive particles range from a very coarse crystal, to 240, a very
fine particle. Special grinding wheels, though not those used on
bench grinders, are made with grain sizes as fine as 600. |
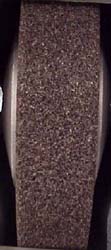
Coarse grit
|
Fine grit
|
| Figure 2
Coarse grit grinding wheel and a fine grit grinding wheel |
Manufacture of Grinding Wheels
Grinding wheels are made by mixing the abrasive grains with the bond,
and molding this mixture into forms of various shapes and sizes. The
wheels are then baked in ovens or kilns to cause the bond to harden and
cure. The grinding wheels are then bushed with lead, babbitt or plastic to
reduce the hole size to the shaft . Lastly, the wheels are accurately
trued, balanced, and inspected prior to shipment.
Grinding Wheel Selection
When purchasing a grinding wheel for the bench grinder, attention
should be given to the size of the wheel (width and diameter), size of
bushing, type and size of abrasive grains, grade, structure, bond, and
maximum safe speed for operating the wheel.
| Grinding wheels are fitted with paper washers glued to both sides
of the wheel to act as cushions between the wheel and the flanges
that hold and support the wheel. Wheel identification information, as
well as the manufacturer's name and trademark, are generally printed
on these washers (Figure 3). |
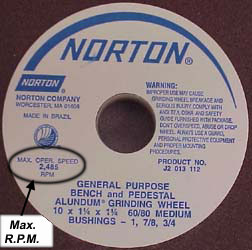
Figure 3 Very important information is
found on the paper washer of the grinding wheel.
|
|
NEVER operate a grinding wheel at speeds
greater than those listed on the wheel. |
The following are features, in list form, which must be specified when
ordering a grinding wheel. (Not all will be used on every wheel.)
- Abrasive type (aluminum ode, silicon carbide, etc.)
- Grit size (8-600) (course to one)
- Grade (A-Z) (soft to hard) (the bond, not the abrasive.)
- Structure (0 or 1-12) (spacing of grains) (The larger the number,
the wider the grain spacing.)
- Bond type (V Vitrified, S-Silicate, B-Resinoid, R-Rubber, and
E-Shellac)
- Diameter
- Width
- Bushing size
- Shape
Grinding is the process of removing material by the cutting action of
the countless hard and sharp abrasive particles of a revolving
grinding wheel as they come in contact with the surface to be ground.
Grinding machines are made in a variety of types and sizes, depending
upon the class of work for which they are to be used.
| The grinding wheels are held between two flanged disks (Figure 6).
A roughing or coarse grained wheel is usually mounted on one end of
the spindle and a fine wheel on the other. A tool rest is provided
for each wheel so that tools may be held or steadied while being
ground (Figure 4). |
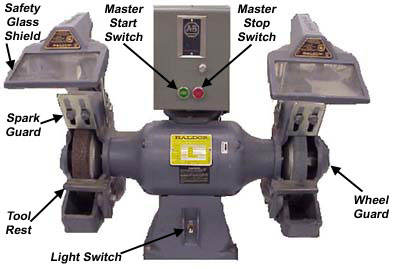
Figure 4 Main parts of a pedestal
grinder
|
The operator is protected against flying abrasive particles and ground
material by the wheel guards, which are an integral part of a machine.
Safety glass shields are also provided for additional protection.
These grinders are used for all kinds of general off-hand grinding and
for the sharpening of drills, chisels, tool bits, and other small tools.
Procedure
Note: Grinders should be lubricated according to the
manufacturer's instructions.
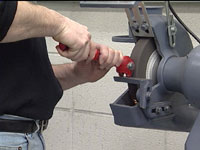
- Examine the grinder to see that the tool rest is set at the
required height, is within 1/8 if an inch to the face of the
wheel, and is securely fastened in this position (Figure 5).
- Adjust safety glass shields on the grinder to permit clear vision
of the part to be ground and still protect the operator from flying
particles.
- CAUTION: Always wear safety glasses when using a
grinder.
|
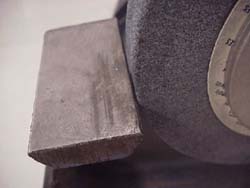
Figure 5 Position of the tool rest
|
- Start the grinder.
CAUTION: Stand to one side of the wheel when operating the grinder.
- Hold the work in one hand, and steady it with the other. Place the
work on the tool rest; then guide it against the face of the revolving
wheel and apply enough pressure to grind, depending upon the hardness
of the material and the wheel itself.
Note: Support the work on the tool rest to steady it when grinding,
except in the case of the small tool bits which can be guided better
by supporting them with the fingers or with a hand resting on the tool rest.
- Cool work in a water pot as it becomes heated from grinding,
especially the small hardened tools which would lose their temper if
overheated. Twist drills should not be cooled by dipping in
water, as it may cause cracking.
- Grind the job to the required shape or size by moving the work back
and forth across the face of the wheel. This will prevent wearing a
groove into the wheel and will result in a flatter surface on the work.
CAUTION: Keep fingers away from the revolving wheel, especially
when grinding small pieces. Also make sure that the tool rest is close
enough to the wheel to prevent the work from slipping into the space
between the two.
Note: Remove as much metal by rough grinding as is possible; then use
the
finer wheel for finishing. (Figure 2)
Do not grind on the side of the wheel except when absolutely
necessary, and then with only light pressure.
- Check work with a gage or other measuring tool.
- Stop grinder.
Mounting a Grinding Wheel
|
The grinder spindle has a right-hand thread on the right end and
a left-hand thread on the other as a safeguard against the wheel
loosening. Each wheel is mounted directly on the spindle of the
bench or floor grinder and is held between a pair of flanged collars
by either the right- or left-hand spindle nut.
Great care must be used when mounting wheels so that no undue
strains are set up, which might cause the wheel to break. A wheel
that fits tightly should never be forced on the spindle. Instead, the
lead-bushed hole should be scraped to make it fit freely.
|
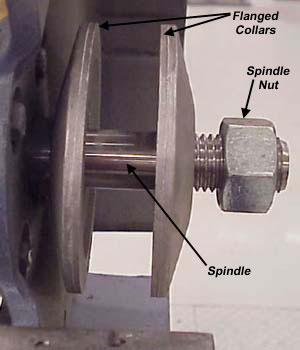
Figure 6 Spindle parts for a
pedestal grinder
|
Blotting paper washers or pads of some soft compressible material are
always placed between the side of the wheel and the flanged collars. This
lessens the danger of setting up strains in the wheel, causing it to crack.
The clamping nut should be drawn only tight enough against the flanged
collar to prevent the wheel from turning on the spindle. After mounting,
the wheel should be checked for trueness and balance.
CAUTION: Replace all guards before starting the grinder.
When starting the grinder with a newly mounted wheel for the first
time, always stand to the side of the wheel and allow it to run for one
minute before starting to grind. This will guard against any injury in the
event the wheel is faulty and should break apart.
Dressing a Grinding Wheel
Dressing is the process of restoring the sharpness of the grinding
wheel by breaking away the dulled abrasive crystals or by removing the
glazed or loaded surface of the wheel, thus presenting new sharp cutting
edges of the abrasive grains. This breaking away is caused by the pressure
of the dresser crushing the bond and releasing the dull abrasive.
This process should not be confused with trueing, which refers to the
shaping of any part of the wheel to run true or to alter it to some
desired shape.
| The tools used for dressing are made in a variety of types and are
called dressers. The more commonly used off-hand dressers are: the
star type and the diamond stick (Figure 7). |
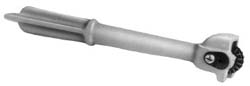

Figure 7 Grinding wheel
dressers
|
To dress the wheel, support the dresser on the tool rest so that the
point of contact is slightly above the center, and with the handle tilted
upward at an angle as shown in Figure 8.
Slowly press the dresser against the face of the revolving wheel until
it "bites." Then move it back and forth to obtain a straight
surface, and at the same time, hold the dresser rigidly enough on the tool
rest to maintain trueness while dressing.
Loading is caused by:
1) metal too soft and/or
2) wheel
bond too strong (Figure 9). When self-sharpening the
wheel, the pressure of grinding will either fracture the
grain or pull it out of the bond when it becomes dull. This action exposes new, sharp-cutting edges. |
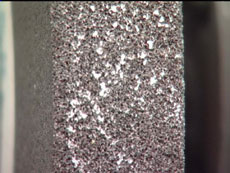
Figure 9 Loaded grinding wheel. |
Grinding is a safe operation if a few basic safety rules are followed.
Use the rules listed below as a guide for safe grinding.
These rules are based on material contained in ANSI B7.1 safety code for
safe use and operation of abrasive wheels.
|
WARNING
IMPROPER USE MAY CAUSE BREAKAGE AND SERIOUS INJURY. |
| DO |
and |
DON'T |
| DO ALWAYS HANDLE AND STORE WHEELS IN A CAREFUL manner. |
DON'T USE A CRACKED WHEEL OR ONE THAT HAS BEEN DROPPED
or has become damaged. |
| DO VISUALLY INSPECT all wheels before mounting for
possible damage and ring test vitrified wheels. |
DON'T FORCE A WHEEL ONTO THE MACHINE OR ALTER the size
of the mounting hole - if the wheel won't fit the machine, get one that
will. |
| DO CHECK MACHINE SPEED against the established maximum
safe operating speed marked on the wheel. |
DON'T EVER EXCEED MAXIMUM OPERATING SPEED established
for the wheel. |
| DO CHECK MOUNTING FLANGES for equal and correct
diameter. |
DON'T USE MOUNTING FLANGES ON WHICH THE BEARING
SURFACES ARE NOT CLEAN, FLAT, AND FREE OF BURRS. |
| DO USE MOUNTING BLOTTERS when supplied with wheels. |
DON'T TIGHTEN THE MOUNTING NUT EXCESSIVELY. |
| DO BE SURE WORK REST is properly adjusted.
(Center of wheel or above; no more than 1/8" away from the wheel.) |
DON'T GRIND ON THE SIDE OF THE WHEEL. (see Safety Code
B7.1 for exception.) |
| DO ALWAYS USE A SAFETY GUARD covering at least
one-half of the grinding wheel. |
DON'T START THE MACHINE UNTIL THE WHEEL GUARD IS IN
PLACE. |
| DO ALLOW NEWLY MOUNTED WHEELS to run at operating
speed, with guard in place, for at least one minute before grinding. |
DON'T JAM work into the wheel. |
| DO ALWAYS WEAR SAFETY GLASSES or some type of eye
protection when grinding. |
DON'T STAND DIRECTLY IN FRONT of a grinding wheel
whenever a grinder is started. |
| DO TURN OFF COOLANT before stopping wheel to avoid
creating an out-of-balance condition. |
DON'T FORCE GRINDING so that the motor slows noticeably or
the work gets hot. |
|